


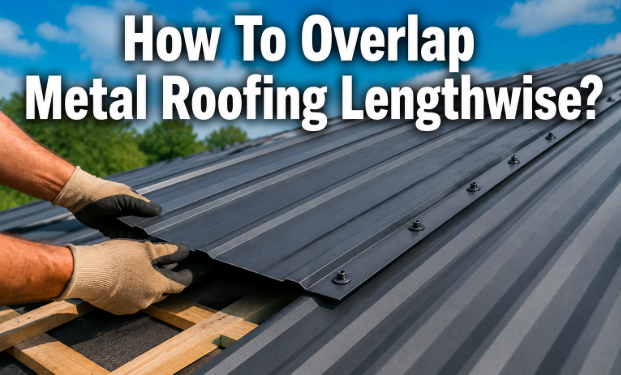
Metal roof panels overlap lengthwise, called an end lap, where the top of one panel meets the bottom of the next as they run up the slope. For most exposed-fastener panels, that overlap needs to be at least 6 inches on steep roofs, and 8 to 12 inches on lower-slope roofs or in areas with heavy rain and wind.
Get this overlap right and water runs straight off the roof every time it rains. Get it wrong and water works its way backward under the panel instead, and you won’t see the damage until it shows up as a stain on the ceiling below.
This guide covers how much overlap to use for your slope, exactly how to install it step by step, and how to seal and fasten it so the seam holds for the life of the roof.
End lap vs. side lap: what’s the difference?
A metal roof has two different kinds of seams, and it helps to keep them straight. The side lap runs up and down the slope, where the edge of one panel overlaps the edge of the panel sitting next to it. This is measured in ribs rather than inches, and one full rib of overlap is standard on most corrugated and ribbed panels.
The end lap, or lengthwise overlap, runs across the slope instead, where the bottom edge of an upper panel overlaps the top edge of the panel below it. This only comes into play on longer roofs, where a single sheet can’t run from eave to ridge in one piece. It’s the end lap, not the side lap, that carries the real risk of leaks, because it sits directly in the path of water running down the roof.
Whenever you can, order panels cut to the full length of the roof slope. Metal panels roll off the line in one continuous piece, and most suppliers will cut to length well past 30 or 40 feet, so a well-planned residential roof often needs no end laps at all. They become necessary mainly on long commercial runs, unusually shaped roofs, or when a supplier’s maximum panel length falls just short of your slope.
How much lengthwise overlap do you need?
The right overlap depends on your roof slope and panel type, not on one fixed number that works everywhere.
On steep roofs, 3:12 or greater, a 6-inch end lap is standard for exposed-fastener panels, sealed with a continuous bead of butyl tape. On lower slopes, roughly 2:12 to 3:12, most panel makers call for 8 to 12 inches of end lap with sealant across the full width of the joint. A shallow slope drains more slowly, which gives wind-driven rain more time to work backward under a short seam, so the extra length buys margin.
Model building code sets the floor beneath all of this. A lapped, non-soldered metal roof with sealant at the laps needs a slope of at least 1/2:12 (4 percent), and the same panel without sealant needs at least 3:12. The International Building Code’s minimum slope requirements for metal roof panels spell this out directly, along with the 1/4:12 minimum allowed for mechanically seamed standing seam systems, which lock together rather than lap.
Below the slope your panel profile is rated for, no amount of extra end lap will keep the roof dry. At that point the fix is a different panel system, typically a mechanically seamed standing seam roof, not a longer overlap on the panel you already have.
| Roof slope | Panel type | Minimum end lap | Sealant required |
| 3:12 or steeper | Exposed-fastener, corrugated or ribbed | 6 inches | Yes, continuous |
| 2:12 to 3:12 | Exposed-fastener | 8 to 12 inches | Yes, full width of lap |
| 1/2:12 to 2:12 | Lapped panel, code minimum | Per manufacturer, often 12 in. or more | Yes, required by code |
| 1/4:12 and up | Standing seam, mechanically seamed | Not applicable; locked seam | Sealant in seam per manufacturer |
Always check the exact figure your panel manufacturer publishes for the profile you’re using before you cut a single sheet. The ranges above cover most residential exposed-fastener panels, but gauge, rib depth, and finish can shift the number slightly, and installing below spec can void the warranty even where local code would allow it.
The overlap also affects how much material you need to order. Every inch of end lap is metal that gets covered up rather than adding new coverage, so a run built from two 20-foot panels with a 12-inch lap only covers about 39 feet, not 40. Add the total lap length back into your material order before you cut anything, or you’ll come up a panel short partway up the slope.
Rule of thumb: 6 inches of end lap on 3:12 slopes or steeper, 8 to 12 inches below that, always sealed with a continuous bead of butyl tape, never a series of dabs.
Step-by-step: how to overlap metal roofing panels lengthwise
Before you start, have a tape measure, chalk line, butyl tape, a drill with the correct screw bit, and the fasteners your manufacturer specifies on hand. Working with everything within reach keeps the sealant from skinning over before the panel is seated, which matters more than it sounds like it would.
- Plan the layout first. Measure the full slope length and figure out where the end lap will fall. Position laps so they stagger from row to row instead of lining up in one straight run across the roof. A straight, unstaggered line of laps concentrates stress on a single seam instead of spreading it out.
- Install the lower panel first. Start at the eave, leave a 1 to 2 inch overhang past the drip edge so water drops into the gutter instead of behind it, and fasten the panel following the standard pattern for that profile.
- Mark the overlap line. Measure up from the top edge of the installed panel by your chosen lap distance, 6 to 12 inches depending on slope, and snap a chalk line so the next panel goes on straight and even.
- Apply sealant to the top of the lower panel. Run a continuous bead of butyl tape or roofing sealant across the full width of the panel, just below the chalk line. Butyl tape is the standard choice for this joint because it stays flexible through hot summers and cold winters, where caulk can harden and eventually crack.
- Set the upper panel in place. Slide its bottom edge down onto the sealant so the ribs line up with the panel below. Check the alignment carefully; a rib that sits even slightly off will telegraph a visible wave through every panel installed above it.
- Press the overlap down firmly along its full length. This seats the sealant evenly before fastening, so the seal isn’t relying on screw pressure alone to close any gaps.
- Fasten through the overlap. Drive fasteners through both layers of metal and into the roof deck or purlin below, spaced at every rib or as your manufacturer specifies, commonly every 9 to 12 inches. Keep screws on the raised ribs, never in the flat valleys, since a valley fastener sits exactly where water collects and pools.
- Check the seam before moving on. Run a hand along the lap to confirm it’s tight, square, and free of gaps, then move up the roof and repeat the process for the next row until you reach the ridge.
Which direction should the overlap face?
Always work into the prevailing wind, not with it. Start your first panel on the side of the roof farthest from the direction storms usually blow in from, and lay each new panel so its overlapping edge faces away from that wind.
Installed this way, wind-driven rain hits the top of a seam and gets pushed off rather than catching an open edge and forcing water underneath it. If you’re not sure which way storms typically move through your area, a local roofing supplier or a regional weather service can tell you the prevailing direction for your site.
Do all metal panel types overlap the same way?
Not quite. Exposed-fastener panels, the corrugated and ribbed profiles most common on homes, garages, and outbuildings, rely on a lapped and sealed end joint exactly as described above, with fasteners driven through both layers.
Standing seam panels work differently. Their side edges lock together mechanically instead of simply overlapping, so a standing seam roof usually runs in a single, continuous length from eave to ridge with no end lap at all.
When a run is too long for one panel, the field-formed seam becomes a specialty detail: the panels are lapped a minimum distance set by the manufacturer, sealed continuously along the joint, and often mechanically seamed shut rather than just screwed down, following the panel maker’s own installation guide for that specific profile.
This kind of end lap is best left to an experienced installer, since a poorly formed standing seam joint is far more likely to leak than the equivalent joint on an exposed-fastener panel, and it’s much harder to inspect once the seam is closed.
Sealing and fastening the overlap correctly
The lap itself only performs as well as the sealant and fasteners behind it. Butyl tape, a soft, non-hardening sealant sold in a roll, is the standard for metal roof overlaps because it compresses evenly under the weight of the panel and stays pliable for decades, unlike silicone or urethane caulk, which can shrink, harden, and eventually crack with age.
Run the tape in one continuous strip across the full width of the panel, never in short pieces with gaps between them. Any break in the bead becomes a point where water can wick sideways into the joint, even if the overlap distance itself is correct.
When you fasten, use the screw type your panel manufacturer specifies, almost always a self-tapping screw with a rubber or EPDM washer. Drive it snug enough to compress the washer and seal cleanly around the shaft, then stop as soon as it sits flush. Overdriving strips the threads out of the deck below and can dimple or crack the panel, which opens a small leak path of its own right next to the one you were trying to close.
Mistakes that cause leaks at the overlap
A handful of recurring errors account for most of the leaks that eventually show up at metal roof end laps.
- Skipping the sealant, or running it in short segments instead of one continuous bead, leaves gaps that let water wick sideways between the panels.
- Using too little overlap for the slope. A 6-inch lap that performs fine on a 4:12 roof isn’t enough once the slope drops below 3:12.
- Fastening in the valleys instead of the ribs, which turns every screw hole into a spot where standing water can pool and eventually find its way through.
- Lining up every end lap in one straight row across the roof instead of staggering them, which puts all the wear and movement on a single seam line.
- Overdriving screws until the washer splits or the panel dimples, either of which opens a new path for water right at the fastener itself.
Any one of these mistakes is easy to avoid the first time around. They’re far harder, and more expensive, to fix once the panels are fastened, sealed, and sitting under a finished roofline.
How to check an existing lengthwise overlap for problems?
If you’re looking at a roof someone else installed, or checking your own work a year or two later, a few signs point straight to a failing end lap. Rust streaks or dark staining running down from a horizontal seam usually mean water is sitting in the joint instead of shedding off it. Fasteners that have backed out slightly, or washers that look cracked and sun-baked, no longer seal the way they did when installed.
Lift the edge of the upper panel gently, without forcing it, and look for sealant that has hardened, pulled away from the metal, or gone missing altogether. Butyl tape should still look soft and slightly tacky; if it’s brittle or crumbling, it has reached the end of its service life and the joint needs to be resealed.
Check that the overlap distance itself still looks close to what the slope calls for. On an older roof, panels can creep slightly from thermal expansion over many seasons, and an overlap that started at 6 inches can end up shorter than that at one edge.
Catching these signs early usually means a resealing job with fresh butyl tape and a few replacement fasteners. Left alone, a failing end lap turns into rot in the decking below, which costs far more to fix than the seam ever would have.
Conclusion
Lengthwise overlap on a metal roof comes down to a few things done consistently: 6 inches of end lap on steep slopes, 8 to 12 inches or more as the pitch flattens out, a continuous bead of butyl tape under every joint, fasteners driven through the ribs rather than the valleys, and laps that face away from the prevailing wind.
Follow that sequence on every panel and the roof sheds water the way it’s designed to, for decades, with little more than an annual check of the seams.
Frequently asked questions
How much should metal roof panels overlap lengthwise?
Most exposed-fastener panels need at least a 6-inch end lap on slopes of 3:12 or steeper, and 8 to 12 inches on lower slopes. Confirm the exact figure against your panel manufacturer’s spec sheet before installing.
Do you need sealant on a metal roof overlap?
Yes. Butyl tape or an equivalent sealant belongs at every end lap and side lap. On lower-slope lapped panel roofs, it’s a building code requirement, not just good practice.
What’s the minimum roof slope for lapped metal panels?
Code allows lapped, sealed metal panels down to 1/2:12, but most manufacturers and installers prefer at least 3:12 for exposed-fastener systems, and recommend mechanically seamed standing seam below that.
Which way should metal roofing overlap face?
Away from the prevailing wind. Start the first panel on the downwind side of the roof and work across, so wind-driven rain can’t push under the open edge of a lap.
Can you overlap metal roofing panels too much?
Yes. Excess overlap adds unnecessary weight and material cost without improving performance, and it can throw off panel spacing across the rest of the roof. Stick to the range your slope and panel type call for.
Related Articles
How to Get Super Glue Off a Wood Floor? Without Ruining the Finish
Why Are Your Hardwood Floors Suddenly Slippery?
Small Black Bugs in Bathroom: What They Are and How to Get Rid of Them