


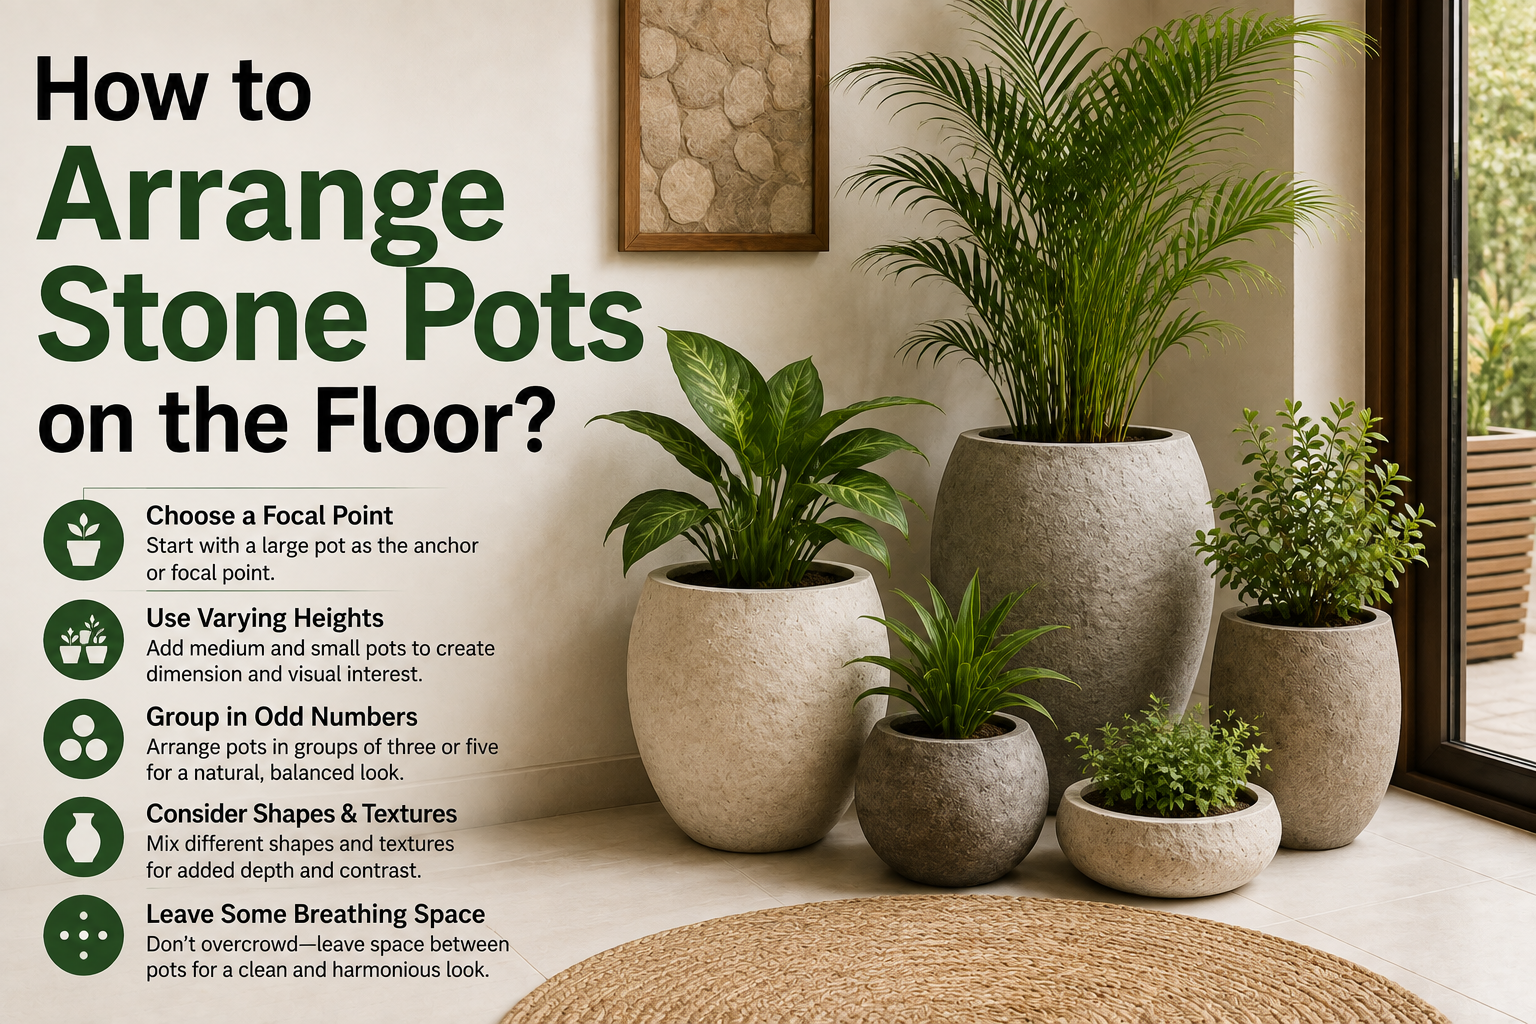
To arrange stone pots on the floor, group them in odd numbers, vary their heights so the cluster forms a rough triangle, keep them in one color or material family, and leave open space around the group so it can breathe. Those four moves are what separate a curated look from a random row of pots. Everything else is refinement.
Stone pots come with one extra consideration that lighter planters do not: they are heavy and hard to shift once they are full. So the smart order of operations is to plan the layout first, protect the floor, and only then set them in place. Here is the full method, from the design idea down to the practical details.
| The one rule to remember: odd numbers, varied heights, one family, and room to breathe. Get those four right and almost any grouping of stone pots will look intentional. |
The short answer: the rule that makes it work
Designers lean on a handful of principles that apply just as well to floor pots as to any other decor. Four of them do most of the work.
Group in odd numbers. Three, five, or seven pots read as more natural and dynamic than an even set. Two pots feel static and a little stiff; three create a triangle your eye keeps moving around. This is the classic rule of three, and it is the backbone of a good arrangement.
Vary the heights. A group where every pot is the same height looks flat. Aim for a tall, a medium, and a low pot so the tops form a visual triangle. If your pots are similar in size, raise one on a low stand, a plinth, or an overturned pot to create that difference.
Keep one family. Unity comes from a shared thread. Stay within one color family or one material, then let size, shape, and finish provide the variety. Matte and glossy stone in the same tone look collected; five clashing colors look chaotic.
Leave negative space. A cluster needs room around it to look deliberate rather than crowded. Give the group open floor on at least one side, and keep a little space between the pots themselves so each one is legible.
Start before you lift anything
Stone is unforgiving of a rushed setup, both on your back and on your floor. A few minutes of planning saves a lot of dragging heavy pots around later.
- Mock up the layout first. Before filling or placing anything, sketch the arrangement or set out empty boxes where the pots will go. It is far easier to move a cardboard stand-in than a loaded stone planter.
- Protect the floor. Stone can scratch wood, chip tile, and leave marks. Put felt pads, cork rounds, or a purpose-made plant caddy under each pot. On wood and laminate especially, this is non-negotiable.
- Mind moisture. If the pots hold live plants, use saucers or cachepots so water never sits against the floor. Trapped moisture under a heavy pot is a slow way to ruin a floor you cannot easily inspect.
- Place empty, then fill. Set each pot in position before adding soil, plants, or water. A stone pot is dramatically easier to nudge a few inches when it is empty.
How to build the arrangement, step by step
With the floor protected and a rough plan in hand, work through the group in order.
- Pick the anchor. Choose your tallest or most striking pot as the focal point. In a planted group, this is the “thriller”: a tall, sculptural plant like a fiddle-leaf fig or a snake plant. Everything else supports it.
- Set the anchor slightly back. Place the tall pot at the back or to one side of the cluster, not dead center, so the shorter pots sit in front of it and stay visible and reachable.
- Add the mid and low pots in a triangle. Position a medium pot and a low one so their centers form a triangle with the anchor rather than a straight line. Offsetting them, one forward, one back, is what gives the group depth.
- Overlap the footprints slightly. Let the pots sit close enough that they read as one group, with the front edges of some pots slightly ahead of others. A tiny bit of overlap in the sightline looks lush; a rigid row looks like storage.
- Step back and adjust. Walk to where you will usually view the group from, whether a doorway or a sofa, and check the balance. Rotate pots so their best side faces out, and tweak spacing until the triangle feels natural.
- Fill and finish. Now add soil and plants, or fill empty decorative pots. A layer of mulch or decorative stones on the soil gives planted pots a clean, finished top.
If you want to break the even-number reflex without buying another planter, add a non-plant element to the group: a small stone sculpture, a stack of two books, or a woven basket. It keeps the odd-number rhythm and makes the arrangement look collected rather than matched.
Best places to put floor pots
Where you set the group matters as much as how you arrange it. A few spots reliably work.
Empty corners. A corner is the classic home for a floor arrangement. A tall pot fills dead vertical space and anchors the room, with smaller pots stepping down from it. Corners near a window are ideal, since most plants want the light.
Flanking furniture or a doorway. Pots work like furniture, so treat them that way. A pot beside a sofa, a fireplace, or an entry softens hard architectural lines and frames the space. For a formal look, a matched pair flanks a doorway; for a relaxed one, an odd cluster sits to one side.
Defining a transition. A large pot or two can mark where one area becomes another, such as the edge of a seating zone or the base of a stair, guiding how people move through the room. Make sure heavy pots are stable and out of the main walking path.
Wherever you place them, leave clear walking room. Overcrowding a space with heavy pots you then have to squeeze past undoes the calm the arrangement is meant to create.
Getting color, texture, and material right
Within that “one family” rule, small choices in finish and texture are what make a grouping feel designed. Use this as a quick guide.
| Element | What works | What to avoid |
| Color | One tone family; neutrals let plants pop | Many competing bold colors |
| Finish | Mix matte and glossy in the same tone | All identical, which reads flat |
| Size | Clear tall, medium, and low difference | Pots all the same height |
| Texture | Rough stone against smooth ceramic | No contrast anywhere |
| Number | Odd: three, five, or seven | Even sets, which feel static |
Neutral stone in white, gray, charcoal, or sand is the easiest base, because it goes with almost any room and lets greenery stand out. If you want a pop of color, let one statement pot carry it rather than the whole set. Texture adds depth too: rough, porous stone next to a smooth glazed pot in the same shade reads richer than a set of identical containers.
Mistakes that make it look cluttered or off
Most disappointing arrangements come down to a short list of missteps. Steer around these:
- Even numbers and matching heights. Two identical pots side by side is the most common flat-looking setup. Go odd and vary the height.
- A straight line of pots. Lining pots up like soldiers reads as storage, not styling. Cluster them into a triangle instead.
- Too many colors. Competing bold pots fight each other. Stay in one family and let one piece be the statement.
- Overcrowding. Cramming too many heavy pots into a small space looks busy and blocks the path. Fewer pots with breathing room look more expensive.
- Skipping floor protection. Setting stone straight on wood or tile invites scratches, marks, and moisture damage. Pads and saucers first, every time.
- Ignoring the plants’ needs. A gorgeous group in a dark corner will slowly die. Match each plant to the light the spot actually gets, or add a grow light. If you are not sure how much light a given corner offers, guides like the University of Maryland Extension’s houseplant light advice help you match plant to place.
Conclusion
Arranging stone pots well is mostly about restraint and a few reliable rules: group in odd numbers, vary the heights into a triangle, keep to one color or material family, and give the cluster room to breathe. Because stone is heavy, plan the layout and protect the floor before you fill anything. Anchor the group with your tallest pot, build a triangle around it, and place it where it fills a corner or frames the room. Do that, and a handful of pots will look like a designer set them there.
Frequently asked questions
How many stone pots should I group together?
Odd numbers look best, so aim for three, five, or seven. Three is the easiest to pull off: one tall, one medium, one low, arranged in a triangle. Even sets tend to look static and formal by comparison.
Do stone pots need something under them on the floor?
Yes. Stone can scratch wood, chip tile, and trap moisture. Put felt pads, cork rounds, or a plant caddy under each pot, and use saucers or cachepots for anything holding a live plant.
Where is the best place to put floor pots?
Empty corners, beside furniture like a sofa or fireplace, or framing a doorway all work well. Corners near a window are ideal, since they fill dead space and give plants the light they need.
Should all my stone pots match?
Not exactly. Keep them in one color or material family for unity, then vary size, shape, and finish for interest. Mixing matte and glossy stone in the same tone looks collected; a set of identical pots can look flat.
How do I make same-size pots look arranged?
Create height differences. Raise one pot on a low stand, plinth, or overturned pot so the tops form a triangle, and choose plants of different heights. Varied elevation is what turns a flat row into a designed group.
Related Articles
How Long Do Toilets Last? A Complete Homeowner’s Guide
How to Remove Sewer Smell from Bathroom: Complete DIY & Expert Guide